
Introduction
Are you tired of the same old look of your living space? Do you crave a fresh and personalized atmosphere that truly reflects your style and personality? If so, DIY Home Decor is the perfect solution for you. DIY, short for “Do It Yourself,” allows you to unleash your creativity and craft beautiful and functional pieces for your home.
In this comprehensive guide, we will explore various DIY Home Decor projects, tips, and ideas to help you revamp your living space. From simple and budget-friendly ideas to more elaborate and impressive projects, we’ve got you covered. So, let’s dive in and embark on a journey to transform your home with creativity and style!
Table of Contents
DIY Home Decor: Getting Started 

Before we jump into the exciting world of DIY Home Decor, let’s go over the basics to ensure a successful and enjoyable experience.
1. Understanding DIY Home Decor
DIY Home Decor is all about creating unique and personalized items for your living space. It allows you to add a touch of your personality to every corner of your home, making it warm and inviting.
2. Essential Tools and Materials
To get started with DIY Home Decor, you’ll need a set of essential tools and materials. These may include a measuring tape, hammer, nails, screws, paintbrushes, power drill, and various crafting materials like wood, fabric, and paints.
3. Safety First!
Remember to prioritize safety when engaging in DIY projects. Always wear appropriate safety gear, such as goggles and gloves, and work in a well-ventilated area.
DIY Home Decor Ideas for Every Room
Let’s explore some exciting DIY Home Decor ideas that cater to every room in your house.
1. Living Room Magic: Create a Gallery Wall 
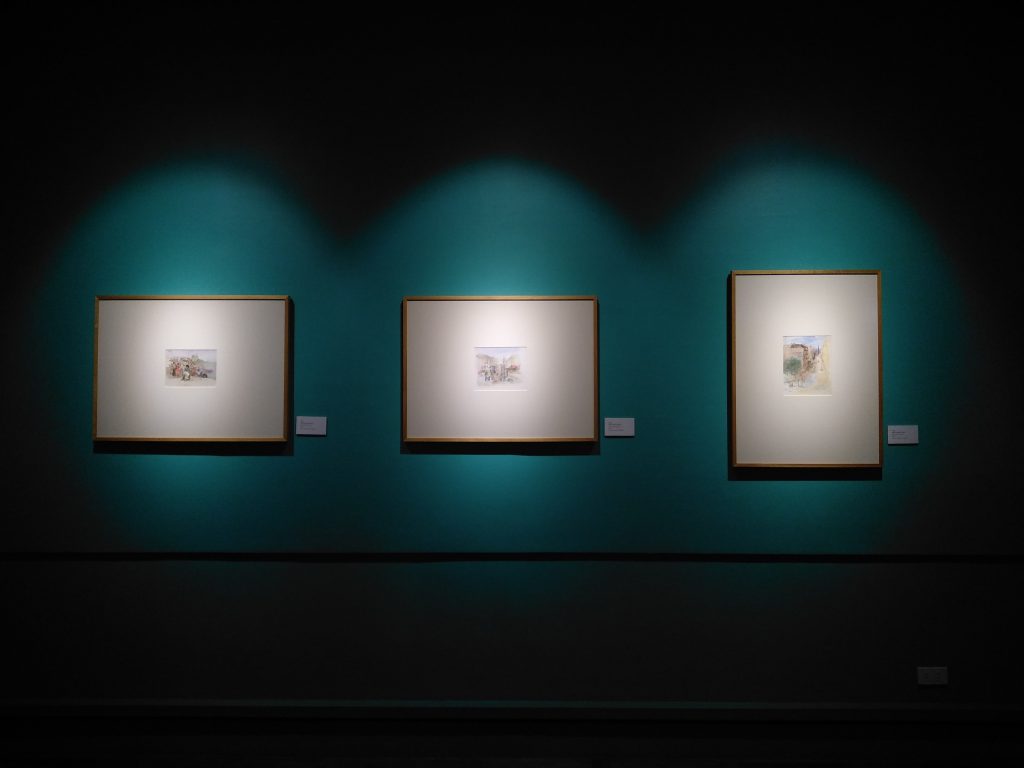
Transform your living room into a captivating space by creating a gallery wall. Frame your favorite artwork, photographs, and quotes in various sizes and arrange them creatively on one wall. This DIY project adds a personal touch to your living room and serves as a conversation starter for guests.
Gathering Your Materials
Before you embark on creating your gallery wall, gather the materials you’ll need:
- Frames: Collect an assortment of frames in various sizes and styles. You can use new frames, thrifted finds, or even repurpose existing ones.
- Artwork and Photographs: Choose a mix of artwork, photographs, and other decorative pieces that hold sentimental value. These could include family photos, travel snapshots, and even your own paintings or sketches.
- Art Supplies: If you plan to include your own artwork, make sure you have the necessary art supplies, such as canvases, paints, brushes, and markers.
Step-by-Step Guide
- Select a Theme or Concept: Decide on a theme or concept for your gallery wall. It could be a collection of family memories, a travel-inspired display, or a mix of different art styles. Having a cohesive theme will help tie the pieces together.
- Choose a Wall: Identify a suitable wall in your living room to serve as the canvas for your gallery. Consider the size of the wall and its proximity to other furniture and decor.
- Arrange and Mock Up: Lay out your frames and artwork on the floor in front of the wall. Experiment with different arrangements until you find a layout that is visually appealing and balanced.
- Create Templates: Trace the outlines of your frames onto craft paper or cardboard, cut them out, and label them with the corresponding artwork. This step will help you visualize the arrangement on the wall.
- Measure and Mark: Use a level and measuring tape to mark where each frame will be hung on the wall. You can use painter’s tape or removable adhesive strips for this step.
- Hang the Frames: Carefully hang each frame according to your markings. Start from the center and work your way outward to maintain symmetry.
- Add Artwork: Place your chosen artwork or photographs into the frames. Be mindful of the spacing and arrangement to create an aesthetically pleasing composition.
- Final Touches: Stand back and assess the gallery wall from different angles. Make any necessary adjustments to ensure the pieces are aligned and balanced.
Tips for a Stunning Gallery Wall
- Mix and Match: Combine different frame styles, colors, and sizes for an eclectic yet harmonious look.
- Vary the Content: Include a mix of photographs, artwork, quotes, and decorative elements to add depth and visual interest.
- Create Visual Flow: Arrange the pieces in a way that guides the viewer’s eye from one frame to another, creating a natural flow.
- Use Command Strips: Consider using removable adhesive strips or hooks to hang frames. They are easy to reposition and won’t damage your walls.
- Consider Lighting: Install wall-mounted or picture frame lights to illuminate your gallery wall and highlight its beauty.
By following this step-by-step guide and incorporating your own unique touch, you can create a captivating and personalized gallery wall that truly adds living room magic to your home.
2. Bedroom Bliss: DIY Headboard 
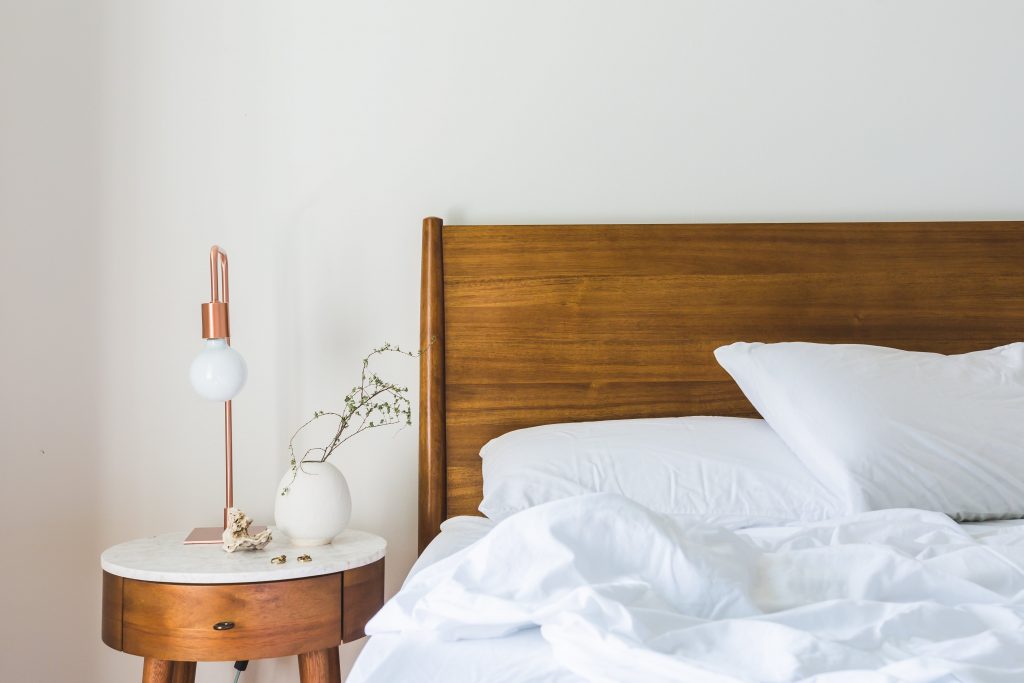
Tired of your plain bedroom headboard? Craft a DIY headboard using reclaimed wood or upholstery. Choose fabrics that complement your room’s color scheme and design a headboard that adds a cozy and stylish touch to your sleep haven.
Materials You’ll Need
- Reclaimed wood or plywood
- Upholstery foam (if desired)
- Fabric of your choice
- Batting
- Staple gun
- Saw
- Sandpaper
- Screws or brackets
- Paint or stain (optional)
Step-by-Step Guide
- Design Your Headboard: Decide on the shape and size of your headboard. You can opt for a classic rectangular design, a stylish silhouette, or even a custom shape that suits your room’s theme.
- Choose Your Material: If using reclaimed wood, clean and sand it to remove any rough edges or splinters. For an upholstered headboard, cut the plywood to your desired shape and size.
- Upholstery (Optional): If you’re creating an upholstered headboard, attach the upholstery foam to the plywood using adhesive spray. Trim any excess foam to match the plywood shape.
- Wrap with Batting: Lay the batting over the foam or wood, ensuring there is enough excess to wrap around the edges. Staple the batting to the back of the headboard, pulling it taut for a smooth finish.
- Choose Fabric: Select a fabric that complements your room’s color scheme and style. Lay the fabric over the batting, making sure it’s centered and straight.
- Secure the Fabric: Starting from the center, staple the fabric to the back of the headboard. Pull the fabric taut as you staple, creating a neat and even surface. Trim any excess fabric.
- Finish the Edges: To create clean corners, fold the fabric at the corners as you would when wrapping a present. Staple securely.
- Attach to Bed Frame: Depending on your bed frame, use screws or brackets to attach the headboard. Make sure it’s securely fastened and level.
- Personalize (Optional): You can paint or stain the wood for a rustic or polished look. You can also add decorative elements like buttons or tufting for added texture.
3. Kitchen Charm: Hand-Painted Tiles
Give your kitchen a fresh and colorful look by hand-painting tiles. You can create intricate patterns or simple designs to match your kitchen’s theme. Hand-painted tiles add a unique charm and make your kitchen a joyful space to cook in.
Materials You’ll Need
- Plain ceramic tiles
- Acrylic paints
- Paintbrushes (various sizes)
- Painter’s tape
- Clear sealant (optional)
Step-by-Step Guide
- Clean and Prep Tiles: Thoroughly clean the ceramic tiles to ensure they are free from dust and grease. This will help the paint adhere better.
- Design and Planning: Decide on the design or pattern you want to paint on the tiles. You can opt for geometric shapes, floral motifs, or even abstract art.
- Tape and Protect: Use painter’s tape to mask off areas that you want to keep unpainted. This creates clean lines and prevents colors from bleeding into each other.
- Painting: Dip your paintbrush into the acrylic paint and begin applying the design to the tiles. Start with the base colors and then add details and layers. Allow each color to dry before moving on to the next.
- Layering and Details: Experiment with layering colors, blending shades, and adding intricate details to create depth and visual interest.
- Drying Time: Allow the painted tiles to dry completely before moving on to the next step. This may take a few hours or overnight, depending on the paint and humidity.
- Sealing (Optional): To protect your hand-painted design, apply a clear sealant over the tiles. This will help prevent scratches and ensure the colors remain vibrant.
- Installation: Once the paint and sealant are dry, you can install the hand-painted tiles as a backsplash or accent in your kitchen. Use tile adhesive to secure them in place.
4. Bathroom Elegance: Mason Jar Organizer
Declutter your bathroom with a stylish and functional mason jar organizer. Paint the mason jars in your desired colors and use them to store bathroom essentials like cotton balls, q-tips, and brushes. This DIY project brings elegance and organization to your bathroom.
Materials You’ll Need
- Mason jars (various sizes)
- Acrylic paint
- Paintbrushes
- Sandpaper
- Twine or ribbon
- Labels (optional)
- Glue or adhesive
Step-by-Step Guide
- Clean and Prepare Jars: Ensure the mason jars are clean and free from any labels or residue. Gently sand the surface for better paint adhesion.
- Choose Colors: Select acrylic paint colors that match your bathroom’s color scheme. You can go for neutral tones or vibrant hues, depending on your preference.
- Painting: Use a paintbrush to apply the acrylic paint to the exterior of the mason jars. You can paint them entirely or create patterns and designs.
- Drying Time: Allow the painted jars to dry completely. This may take a few hours, so be patient.
- Decorative Details: Enhance the elegance of the mason jars by adding decorative elements. Wrap twine or ribbon around the neck of the jars and secure with glue or adhesive.
- Labeling (Optional): If you’re using the mason jars for specific bathroom essentials, consider adding labels or tags to easily identify their contents.
- Arrangement: Arrange the painted and decorated mason jars on a bathroom shelf, countertop, or window sill. Group them together or scatter them for a charming display.
- Storage: Use the mason jars to store bathroom essentials such as cotton balls, q-tips, makeup brushes, and more. Enjoy the organized and elegant look they bring to your space.
5. Dining Delight: Custom Table Runner
Design a custom table runner for your dining table using fabric paint or embroidery. Personalize it with your family’s initials or a meaningful quote. The custom table runner adds a warm and welcoming touch to your dining area.
Creating a DIY table runner is a simple yet impactful project that can instantly transform the look of your dining area.
Materials You’ll Need
- Fabric of your choice (cotton, linen, burlap, etc.)
- Fabric paint or markers
- Stencils (optional)
- Paintbrushes
- Painter’s tape
- Iron
Step-by-Step Guide
- Choose Your Fabric: Select a fabric that suits your dining table and complements your overall decor. Consider the color scheme and pattern that you want to incorporate into the design.
- Measure and Cut: Measure the length and width of your dining table, adding a few inches on each side for overhang. Cut the fabric accordingly, ensuring it fits well on the table.
- Design and Stencils: Decide on the design you want for your table runner. You can either freehand paint or use stencils for a more precise pattern. If using stencils, secure them in place with painter’s tape.
- Painting: Dip your paintbrush into the fabric paint and apply it evenly onto the fabric. Follow the lines of the stencil or create your own design. You can experiment with different colors and patterns to achieve the desired look.
- Drying and Curing: Allow the paint to dry completely according to the manufacturer’s instructions. Some fabric paints require heat-setting with an iron to ensure the design remains vibrant and long-lasting.
- Finishing Touches: Once the paint is dry and set, remove any painter’s tape and give the table runner a quick ironing to smooth out any wrinkles.
- Table Display: Lay your custom table runner on the dining table and marvel at the instant transformation. Pair it with coordinating placemats, dinnerware, and centerpieces for a cohesive and inviting dining setup.
6. Adding Greenery: Indoor Plant Decor
Bringing the outdoors inside is a delightful way to infuse life and freshness into your home. Incorporating indoor plants as part of your DIY Home Decor can create a serene and inviting ambiance while improving air quality.
Choosing the Right Indoor Plants
When selecting indoor plants for your home, consider factors such as lighting conditions, maintenance requirements, and the overall aesthetic you want to achieve.
- Low Light Plants: If your home has limited natural light, opt for low-light plants like snake plants, pothos, and peace lilies. These plants thrive in shaded areas and are relatively easy to care for.
- Succulents and Cacti: Succulents and cacti are popular choices for beginners and those with busy schedules. They require minimal watering and add a touch of desert charm to your decor.
- Foliage Varieties: Plants with vibrant and textured leaves, such as ferns, monstera, and rubber plants, can add a lush and tropical vibe to your space.
DIY Planters and Pots
Personalize your indoor plant display by crafting your own planters and pots. Here are a few ideas to get you started:
- Repurposed Containers: Upcycle old tin cans, wooden crates, or glass jars to create unique plant containers. Paint or decorate them to match your decor theme.
- Macrame Plant Hangers: Craft macrame plant hangers using ropes or cords. Hang your potted plants in different heights to create an eye-catching display.
- Terrariums: Build your own mini ecosystem by creating a terrarium. Choose small plants that thrive in a humid environment and add decorative elements like pebbles and figurines.
Caring for Your Indoor Plants
To ensure the health and longevity of your indoor plants, follow these care tips:
- Watering: Research the watering needs of each plant and avoid overwatering. Use a well-draining potting mix and allow the soil to dry out between waterings.
- Lighting: Place plants in appropriate lighting conditions. Some plants prefer bright, indirect light, while others thrive in low light.
- Humidity: Some plants, especially tropical varieties, require higher humidity levels. Mist the leaves regularly or place a tray of water near the plants.
- Pruning and Maintenance: Trim dead or yellowing leaves to encourage new growth. Regularly dust the leaves to allow optimal light absorption.
- Repotting: As your plants grow, they may outgrow their pots. Repot them into slightly larger containers to provide ample space for their roots.
7. Personalized Wall Art: Photo Canvas Prints
Capture your cherished memories and turn them into stunning wall art with personalized photo canvas prints. This DIY Home Decor idea adds a sentimental and artistic touch to any room.
Materials You’ll Need
- Canvas panels or stretched canvas
- Acrylic paint (optional)
- Mod Podge or decoupage glue
- Printed photographs
- Paintbrushes
- Scissors
Step-by-Step Guide
- Select Your Photos: Choose a selection of your favorite photographs that you want to display as canvas prints. Ensure they are of high resolution for optimal clarity.
- Prepare the Canvas: If desired, paint the canvas panels with a base coat of acrylic paint in a color that complements your photos. This step adds depth and dimension to the final piece.
- Trim and Arrange: Carefully trim your printed photographs to fit the canvas size. Arrange them on the canvas, experimenting with different layouts until you find the perfect arrangement.
- Decoupage Technique: Apply a thin layer of Mod Podge or decoupage glue onto the back of a photograph. Carefully press it onto the canvas, smoothing out any air bubbles or wrinkles. Repeat for all photos.
- Layering and Overlapping: Create visual interest by layering photos on top of each other or allowing them to slightly overlap. This adds depth and complexity to the overall design.
- Sealing the Artwork: Once all photos are in place, apply a final coat of Mod Podge or decoupage glue over the entire canvas to seal the artwork. This protects the photos and adds a glossy finish.
- Drying Time: Allow the canvas to dry completely, following the recommended drying time for the Mod Podge or decoupage glue.
- Display: Hang your personalized photo canvas prints on the wall using adhesive hooks or picture hangers. Enjoy the heartwarming and eye-catching display of your cherished memories.
8. Transforming Furniture: Upcycling Projects
Give old and worn furniture a new lease on life through creative upcycling projects. Upcycling involves repurposing and revamping existing pieces to create something fresh and unique.
Finding Upcycling Candidates
Search your home, thrift stores, or garage sales for furniture pieces that have potential. Look for solid structures with interesting shapes that can be transformed with a bit of creativity.
Upcycling Ideas
- Paint and Stain: Give wooden furniture a makeover with a fresh coat of paint or stain. Experiment with different colors and techniques like distressing or ombré effects.
- Decoupage Makeover: Apply decorative paper or fabric to furniture surfaces using the decoupage technique. This adds visual interest and texture to the piece.
- Drawer Pull Upgrade: Replace old and worn drawer pulls and handles with stylish and modern alternatives. This small change can make a big difference in the overall look.
- Pattern Play: Use stencils or painter’s tape to add intricate patterns or designs to furniture surfaces. This is a great way to customize plain pieces and make them stand out.
Step-by-Step Guide
- Preparation: Clean the furniture piece thoroughly and sand any rough areas. Remove hardware or components that you plan to replace.
- Paint or Stain: Apply your chosen paint or stain to the furniture using smooth, even strokes. Allow each coat to dry before applying the next.
- Decoupage: Cut and arrange your chosen paper or fabric on the furniture surface. Apply decoupage glue and smooth out any wrinkles or bubbles.
- Drawer Pull Replacement: Unscrew the old hardware and attach the new drawer pulls or handles using a screwdriver.
- Pattern Application: Use stencils or painter’s tape to create your chosen design. Apply paint within the designated areas, and carefully remove the stencil or tape once the paint is dry.
- Finishing Touches: Apply a clear protective finish (such as polyurethane) to seal the paint or stain and protect the furniture from wear and tear.
Frequently Asked Questions (FAQs)
- What are some easy and budget-friendly DIY Home Decor ideas? DIY Home Decor offers numerous budget-friendly ideas, such as creating a gallery wall, crafting custom table runners, and repurposing old items.
- Can DIY Home Decor projects be a fun family activity? Absolutely! DIY projects are perfect for involving the whole family. It’s a great way to bond, unleash creativity, and create beautiful memories together.
- Are there any online resources for DIY Home Decor inspiration? Yes, the internet is a treasure trove of DIY Home Decor inspiration. You can find ideas, tutorials, and step-by-step guides on websites, blogs, and social media platforms.
- How can I ensure my DIY Home Decor projects are environmentally friendly? You can use eco-friendly materials, recycle old items, and repurpose furniture to make your DIY projects more sustainable and environmentally friendly.
- What if I’m not particularly skilled at crafting? DIY Home Decor is for everyone, regardless of crafting skills. Start with simple projects and gradually challenge yourself with more complex ideas as you gain confidence.
- Can I sell the DIY Home Decor items I make? Yes, many people turn their passion for DIY into a business by selling their creations. You can set up an online shop or participate in local craft fairs to showcase and sell your items.
- Can I upcycle furniture if I have no prior crafting experience? Absolutely! Upcycling furniture is a great way to start your crafting journey. Begin with simple projects and gradually tackle more complex pieces as you gain confidence.
- How do I ensure that my upcycled furniture pieces are durable? Proper preparation, high-quality paint or stain, and a clear protective finish are key to ensuring the durability of your upcycled furniture. Follow the recommended instructions for each product.
- Are there any online tutorials for DIY furniture upcycling? Yes, there are numerous online tutorials, videos, and blogs that provide step-by-step guidance for various furniture upcycling techniques. These resources can offer valuable insights and inspiration.
- Can I upcycle furniture to match my existing decor? Absolutely! Upcycling allows you to customize furniture to match your decor theme. You can choose paint colors, patterns, and finishes that complement your existing design.
- What tools and materials do I need for furniture upcycling? Depending on the project, you may need sandpaper, paintbrushes, paint or stain, decoupage glue, stencils, painter’s tape, and protective finishes. Gather the necessary supplies before starting.
- Can upcycled furniture be sold or gifted? Yes, many people upcycle furniture and either sell their creations or gift them to friends and family. Upcycled pieces can be unique and meaningful gifts or additions to your home decor.
Conclusion
DIY Home Decor opens a world of creativity and self-expression, allowing you to transform your living space into a reflection of your unique personality. With a bit of imagination, essential tools, and the will to explore, you can craft beautiful and meaningful pieces that breathe life into your home. So, why wait? Dive into the world of DIY Home Decor and make your living space truly yours!
Remember, DIY Home Decor is not just about aesthetics but also the joy of creating something with your own hands. Embrace the process, learn from every project, and revel in the satisfaction of seeing your creativity come to life. Happy crafting!
Useful Links And Resources
- DIY Headboard:
- Better Homes & Gardens: DIY Headboard Ideas
- Country Living: DIY Headboard Projects
- Good Housekeeping: Easy DIY Headboard Ideas
- Hand-Painted Tiles:
- Homes To Love: How to Paint Tiles: Easy DIY Project
- This Old House: How to Paint Over Ceramic Tile in a Bathroom
- Bob Vila: How To Paint Tile: Update Your Home In Style
- Mason Jar Organizer:
- Country Living: 25 Mason Jar Ideas for Every Room in Your Home
- The Spruce Crafts: Clever and Useful Bathroom Storage Ideas
- Modge Podge Rocks: Mason Jar Crafts for All Occasions
These sources provide detailed instructions, tips, and inspiration for each DIY Home Decor project. They are reputable websites known for their expert advice and reliable information. Make sure to refer to these sources for further guidance and ideas as you embark on your creative endeavors.